

TL;DR
A full-stack web app based on SQLite, Flask, Reken and Tailwind. Source code and run instructions can be found in repo reken-fullstack-demo. A live UI only demo is available at reken.dev
Intro
Most of the Reken demos and samples I have build so far for Reken focussed on the front-end functionality and if they demo-ed REST API calls to a backend, they were existing REST API's. In this blog post we will show not only how to create a dynamic, interactive Web App based on Reken, but also how to create a SQLite database sourced REST API written with Python Flask, and how to style the Web App with Tailwind. The Web App will perform CRUD (Create, Read, Update and Delete) operations on a table with employee information.


SQLite - Database
To store the employee information we will use SQLite, a fast, lightweight database engine. The employee table has the following fields: employee_id, name, phone email, location and department. The location and department fields contain a foreign key to their respective lookup tables.
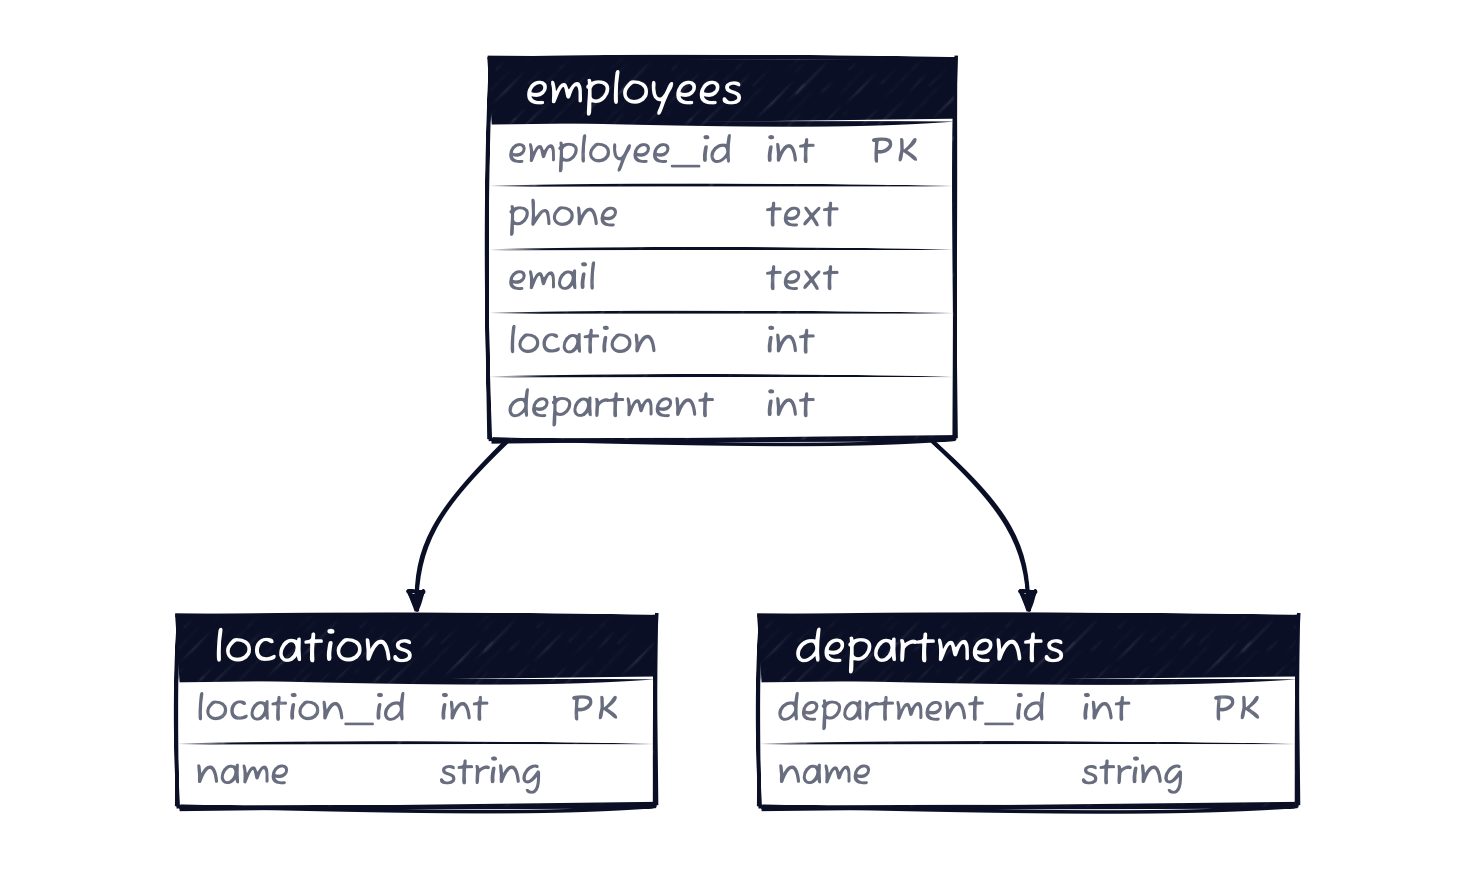
We'll create the SQLite database schema from our backend python code. On startup we connect to SQLite, check if the the employees database exists. If not it will be created and we'll define the database tables: employees, locations and departments. Since we are using foreign keys to the locations and departments tables we turn the SQLite setting to use foreign keys on.
PRAGMA foreign_keys = ON;

CREATE TABLE locations (
    location_id INTEGER PRIMARY KEY NOT NULL,
    name TEXT NOT NULL
);

CREATE TABLE departments (
    department_id INTEGER PRIMARY KEY NOT NULL,
    name TEXT NOT NULL
);

CREATE TABLE employees (
    employee_id INTEGER PRIMARY KEY NOT NULL,
    name TEXT NOT NULL,
    email TEXT NOT NULL,
    phone TEXT NOT NULL,
    location REFERENCES locations(location_id),
    department REFERENCES locations(department_id)
);
After we created the tables we populate the lookup tables locations and department. This will ensure that the locations and department values are valid and consistent.
# Populate the locations table
INSERT into locations (name) values('Boston, MA');
INSERT into locations (name) values('New York, NY');
INSERT into locations (name) values('Austin, TX');
INSERT into locations (name) values('San Diego, CA');

# Populate the departments table
INSERT into departments (name) values('Finance');
INSERT into departments (name) values('Marketing');
INSERT into departments (name) values('Development');
INSERT into departments (name) values('Human Resources');
INSERT into departments (name) values('Sales');
INSERT into departments (name) values('Legal');
We have now created the storage layer and populated it with some seed data. We are ready to build the REST API for it.
Python Flask - Rest API
To update retrieve and update the employee data, we'll implement the following REST endpoints in Python Flask. Flask is powerful and flexible micro web framework for Python.
| Endpoint | HTTP method | Description |
|---|---|---|
| /api/employees | GET | Fetch all employees |
| /api/employees | POST | Create new employee |
| /api/employees | PUT | Update employee |
| /api/employees/{employee_id} | GET | Fetch employee for employee_id |
| /api/employees/{employee_id} | DELETE | Delete employee for employee_id |
| Employee REST Endpoints | ||
Routing decorations
Flask has an easy way to define routing endpoints. You define a endpoint by adding a routing decoration (starts with an @) to the function that processes the request.
# routing decoration
@app.route("/api/employees")
# function handling the request for this route
def api_employees():
return jsonify(get_employees())The routing section that handles all the 5 endpoints, including the POST, PUT and DELETE from the table above looks like this.
@app.route('/api/employees', methods=['GET','PUT', 'POST'])
def api_employees():
    if request.method == 'GET':
        return jsonify(get_employees())
    elif request.method == 'PUT':
        employee = request.get_json()
        return jsonify(update_employee(employee))
    else:
        employee = request.get_json()
        return jsonify(insert_employee(employee))

@app.route('/api/employees/<employee_id>', methods=['GET','DELETE'])
def api_employee(employee_id):
    if request.method == 'GET':
        return jsonify(get_employee_by_id(employee_id))
    else:
        return jsonify(delete_employee(employee_id))
As you can see there are two routing decorators. The first decorator /api/employees handles methods GET, PUT and POST. The GET method calls the get_employees() function. The PUT method calls the update_employee(employee) function, and the POST method calls the insert_employee(employee)function. The last two functions pass the request's employee detail JSON into the function.
The second routing decorator takes the employee_id argument from the request and handles the GET and DELETE methods. When the endpoint is called with a GET method the employee details for the employee with employee_id is returned. When the DELETE method is provided the employee with employee_id is removed from the database.
Get Employees
The following functions process the REST calls. We start with the get_employees` function.
def get_employees():
    employees = []
    try:
        conn = connect_to_db()
        conn.row_factory = sqlite3.Row
        cur = conn.cursor()
        cur.execute("SELECT * FROM employees")
        rows = cur.fetchall()

        # convert row objects to dictionary
        for i in rows:
            employee = {}
            employee["employee_id"] = i["employee_id"]
            employee["name"] = i["name"]
            employee["email"] = i["email"]
            employee["phone"] = i["phone"]
            employee["location"] = i["location"]
            employee["department"] = i["department"]
            employees.append(employee)

    except:
        employees = []

return employeesIt starts by creating an empty array, after fetching a SQLite connection, creates a cursor. After executing `select * from employees` on the cursor, all the rows are fetched. We then loop through all rows and for each row build the employee object, which is then added to the employees array.
Insert Employee
Our next function insert_employee(employee) adds a new employee to the database.
def insert_employee(employee):
    inserted_employee = {}
    try:
        conn = connect_to_db()
        cur = conn.cursor()
        cur.execute("INSERT INTO employees (name, email, phone, location, department) VALUES (?, ?, ?, ?, ?)",
          (employee['name'],
           employee['email'],
           employee['phone'],
           employee['location'],
           employee['department'])
          )
        conn.commit()
        inserted_employee = get_employee_by_id(cur.lastrowid)
    except:
        conn().rollback()

    finally:
        conn.close()

    return inserted_employee
Again we start with a connection to the database, from there we get the cursor. We then execute an insert statement on the employee table. We bind the employee property values we received from the REST API call on the execute statement. Note we do not specify the employee_id as that is automatically generated during the insert. After commiting the insert, we request the employee data back via the get_employee_by_id(cur.lastrowid) (see below of the implementation) call and return it to the client. The employee object will now contain the database generated employee_id value.
Update Employee
To update the employee information with the UPDATE method, we call the update_employee(employee) method.
def update_employee(employee):
    updated_employee = {}
    try:
        conn = connect_to_db()
        cur = conn.cursor()
        cur.execute("UPDATE employees SET name = ?, email = ?, phone =  ?, location = ?, department = ? WHERE employee_id =?",
                     (employee["name"],
                      employee["email"],
                      employee["phone"],
                      employee["location"],
                      employee["department"],
                      employee["employee_id"],)
                     )
        conn.commit()
        #return the employee
        updated_employee = get_employee_by_id(employee["employee_id"])

    except:
        conn.rollback()
        updated_employee = {}
    finally:
        conn.close()

return updated_employeeHere the employee object is required to have the employee_id included. Similar as with the insert operation, we fetch the connection, request its cursor and instead of the insert statement now execute an update statement. After the commit we return the updated employee information using the`get_employee_by_id(employee["employee_id"]) (see next paragraph for the implementation).
Get Employee
To return a employee object for a giving employee_id we call the get_employee_by_id(employee_id) method. This is used by the GET employee REST endpoint, and also by the create_employee() and update_employee() functions.
def get_employee_by_id(employee_id):
    employee = {}
    try:
        conn = connect_to_db()
        conn.row_factory = sqlite3.Row
        cur = conn.cursor()
        cur.execute("SELECT * FROM employees WHERE employee_id = ?",
                       (employee_id,))
        row = cur.fetchone()

        # convert row object to dictionary
        employee["employee_id"] = row["employee_id"]
        employee["name"] = row["name"]
        employee["email"] = row["email"]
        employee["phone"] = row["phone"]
        employee["location"] = row["location"]
        employee["department"] = row["department"]
    except:
        employee = {}

return employeeThe get_employee_by_id(employee_id) first connects to the database and create a cursor from the connection. The cursor executes the select statement and binds the employee_id to the where clause. Once the row is fetched, the employee data is applied on the employee object, which is then returned.
Delete employee
The last function we discuss is the delete_employee(employee_id) function.
def delete_employee(employee_id):
    message = {}
    try:
        conn = connect_to_db()
        conn.execute("DELETE from employees WHERE employee_id = ?",
                      (employee_id,))
        conn.commit()
        message["status"] = "employee deleted successfully"
    except:
        conn.rollback()
        message["status"] = "Cannot delete employee"
    finally:
        conn.close()

return messageIt takes as an argument the employee_id of the employee to be deleted. The function gets a connection to the database and then executes a the delete statement on that connection. If the operation is successful it returns an message stating that, or otherwise when it fails.
These five functions combined with the two routing annotations implement the REST API functionality. We can now see how to the Web Application uses the REST API.
Reken - Web App
In this section we will a build a simple table UI to view and update the employee data. Here a wireframe of the application.
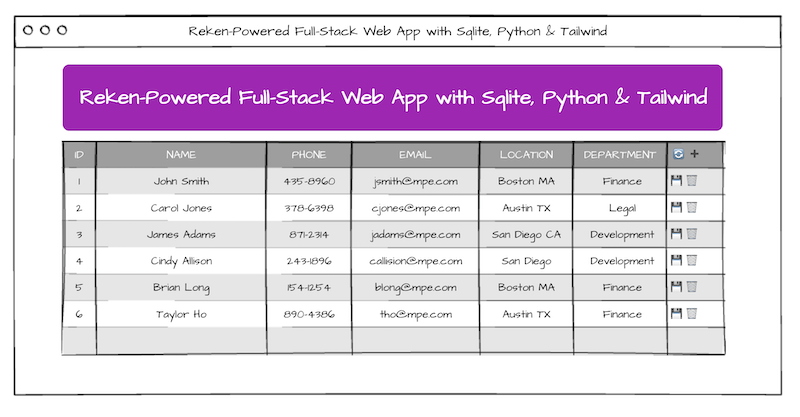
The UI displays a hero header with the title, followed by a table that displays the employees. It show the columns: employee_id, name, phone, email, location and department. The last column is an action column with the following action buttons:
- 🔄 - Refresh the table. This calls the GET Method on the /api/employee route.
- ➕ - This clones the first row in the table and inserts it as the first row in the table.
- ❌ - This shows after cloning a new row and when pressed removes the cloned row from the table.
- 💾 - On a new row this calls the POST method on the /api/employee route.
- 💾 - On a existing row this calls the PUT method on the /api/employee route.
- 🗑️ - This calls the DELETE method on the /api/employee/{employee_id} route.
The HTML UI is made data-driven and interactive with the Reken library. Here we will the discuss the HTML for the UI. Before we start we need to install Reken.
Load Reken library
<script src="https://cdn.jsdelivr.net/gh/hbroek/reken/dist/reken.min.js"
</script>
Even though this is the last element before the closing html element, I mention it first as this loads the latest version from the Reken library from the jsdeliver CDN.
Header
We start with the header, this is standard HTML
  <header>
    <h1><a href="https://reken.dev">Reken</a>-Powered Full-Stack Web App with SQLite, Python Flask & Tailwind
      </h1>
    <h3>CRUD operations on a employee database table</h3>
  </header>
Next the table with the employee information, we will discuss these in various sections.
Fetch all employees
<table data-rest="employees:${SERVER}/api/employees"
       data-rest-options="listOptions">
The table element has 2 Reken attributes:
- data-rest; This points to the rest endpoint /api/employees and the result of the REST call gets stored in the employees javascript variable.
- data-rest-options; this points to a javacript object called listOptions and uses the properties for the REST call. listOptions is only used for the boolean
fetchproperty. When set to true the REST call gets executed and afterwards automatically set to false.
Delete employee
<thead data-rest="result:${SERVER}/api/employees/${deleteOptions.id}" data-rest-options="deleteOptions">
The thead element uses the same two Reken attributes but these initiate the delete Rest point. Note data-restand data-rest-options can be placed on any element. As they do not directly affect the elements appearance. Do be careful with elements with a data-if and inside a data-for loop.
- data-rest; This points to the rest end point /api/employees, the result gets stored in the result variable.
- data-rest-options; this points to a javascript object called deleteOptions and uses the properties for the REST call. deleteOptions uses the boolean
fetchproperty, but also the propertymethodwhich is set to DELETE. It also has a propertycallbackthat points to a closure that gets called when the REST call completes. The closure sets the propertyfetchon the listOptions function to true, which results in a re-fetch of the employees and a rerender of the table.
Insert employee
<tr data-rest="employees[0]:${SERVER}/api/employees" data-rest-options="createOptions">On the tr element in the thead element we added another pair of data-rest and data-rest-options, these call the POST (Create) method on the /api/employees endpoint.
- data-rest; This points to the REST endpoint /api/employees, the result, the newly created employee object gets stored in the first row of the employees array.
- data-rest-options; this points to a javascript object called createOptions and uses the properties for the REST call. createOptions uses the boolean
fetchproperty, but also has the propertymethodwhich is set to POST. It also has a propertyheadersproperty with a propertycontent-typewith the valueapplication/json. This will allow us to post a JSON body to the endpoint. When the user hits save on the newly inserted row, it gathers the employees[0] object, stringifies it and sets it on the createOptions propertybody.
Display table headers and header actions
        <th>Id</th>
        <th>Name</th>
        <th">Phone</th>
        <th">Email</th>
        <th">Location</th>
        <th">Department</th>
        <td data-if="active:active">
          <button type="button"
            data-action="listOptions.fetch=true"
            title="Refresh rows">🔄
          </button>
          <button data-if="!addMode"
            type="button"
            data-action="addMode=true;employees.unshift(employees.length>0?{ ...employees[0]}:{employee_id:'',name:'',location:'',department:'', phone:'', email:''});employees[0].employee_id=''"
            title="Insert new row">➕
          </button>
        </td>
The first 6 columns are standard table headers columns. The last header column is an action column with 2 buttons.
The first button, 🔄, via the data-action attribute, sets the listOption property fetch to true, which results in a re-fetch of all the employee rows,
The second button, ➕, via the data-action attribute, adds a new employee object as the first row on the employee array. If the array has rows (employees.length>0) it clones the current first row object, if there are no employees yet, an employee object with empty fields is inserted. It sets the variable addMode to true.
The second button also has a data-if attribute that says to hide the Add button when we are in addMode.
Display table body and update employee
<tbody data-rest="result:${SERVER}/api/employees"
       data-rest-options="updateOptions"
       data-for="u:employees">
The table body element has the data-rest and data-rest-options attributes to call the PUT (Update) method on the /api/employees endpoint. It also has a data-for attribute that loops through the employees array.
The data-rest attribute again points to the /api/employees endpoint and the resulting return object is stored in the results variable.
The data-rest-options attribute points to the updateOptions variable and contains the following properties:
-
fetchto trigger the REST call when the user hits save. -
methodwhich is set to PUT. - And
content-typewhich tells the server that the PUT content is of mime-typeapplication-json. - When the user hits save, we also add the
bodyproperty with the updated employee info in json format.
The data-for attribute loops over the employee array and provides array element information in the u loop variable. The u variable provides the properties index , the index of the employee array and item which points to the employee object. This variable is available to any of the tbody HTML elements. More on that below.
Display table employee rows
<td data-text="${u.item.employee_id}"></td>
<td><input data-value="u.item.name"></td>
<td><input data-value="u.item.phone" type="tel"/></td>
<td>
    <input data-value="u.item.email" type="email"/></td>
<td>
    <select data-for="l:locations" data-value="u.item.location">
        <option data-attr-value="${l.item.location_id}"
                data-text="${l.item.name}">
        </option>
    </select>
</td>
<td>
    <select data-for="d:departments" data-value="u.item.department">
        <option data-attr-value="${d.item.department_id}"
                data-text="${d.item.name}">
        </option>
    </select>
</td>
The first data column of the row displays the employee_id. Notice that we display it with data-text attribute, which fetched the id via the u.item loop variable. Note the id cannot be edited.
All the other employee fields can be edited and we use <input> and <select> as input controls.
The Employee's phone and email properties are bound with the data-value attribute to the input element. The phone input is of type tel and the email input is of type email
Both the location and department employee properties use a select as an input as both have a limited set of options to choose from. The select both use a data-for to render the option elements based on the locations and departement arrays. We will discuss how the arrays are populated later on, but they contain the id and name properties of the lookup tables in the database. The data-value attribute binds the location and department employee property to the select element.
The option element has two Reken attributes. The data-attr-value sets the value attribute based on the id and the data-text attribute sets the option's label.
Employee row actions
<td>
    <button data-if="!addMode||u.index>0"
            type="button"
            data-action="updateOptions.fetch=true;
                         updateOptions.body=JSON.stringify(u.item)"
            title="Save row changes">💾
    </button>
    <button data-if="!addMode||u.index>0" type="button"
            data-action="deleteOptions.id=u.item.employee_id;
                         deleteOptions.fetch=true"
            title="Delete row">🗑️
    </button>
    <button data-if="addMode&&u.index===0" type="button"
            data-action="createOptions.fetch=true;
                         createOptions.body=JSON.stringify(u.item);
                         addMode=false;"
            title="Save new row">💾
    </button>
    <button data-if="addMode&&u.index===0"
            type="button"
            data-action="employees.shift();
                         addMode=false"
            title="Cancel row insert">❌
    </button>
</td>
The action column has 4 buttons, but depending on whether we are in inserting an employee (addMode and on the first row), some buttons are enabled/disabled.
if we are doing a regular edit of a row, the 'Save row changes' button will execute the data-action code when pressed. In this case it will set the updateOptions.fetch to true (activating the REST call) and set the updateOptions.body property with the updated employee info in a JSON string.
Also enabled in the regular edit mode is the 'Delete row' button. It will set the deleteOptions.id property with the employee's id to be deleted and trigger the REST Call with the by setting the deleteOptions.fetch property.
If we are inserting a new employee the 'Save new row' is active and pressing the button sets the createOptions.fetch, and sets the createOptions.body. We also stop insert mode by resetting addMode.
We can cancel out of insert mode, without creating the new employee, with the 'Cancel row insert' button. It remove the first item from the employees array and resets the addMode to stop insert mode.
Table footer
<tfoot>
    <tr>
        <td colspan="7">🔄 Refresh rows, ➕ add new row, 💾 save row,
            🗑️ delete row, and ❌ cancel new row.
        </td>
    </tr>
</tfoot>
In the table footer we explain what the different action icons mean. The colspan attribute ensures the td spans the width of all the columns.
This concludes the table setup that displays the data, allows employee data-entry and provides various actions on the employees data.
Loading the lookup data
<div hidden data-rest="departments:${SERVER}/api/departments"></div>
<div hidden data-rest="locations:${SERVER}/api/locations"></div>
We load the lookup data for the departments and locations arrays with two hidden div elements using their respective REST endpoints. Since we merely use these elements to fetch the lookup data and not display them here we hide them with the hidden attribute. Note these fetches are only done once at the start of the application.
Javascript variables
const SERVER = 'http://127.0.0.1:5000'
let employees = []
let departments = []
let locations = []
let result;
let addMode = false;

let listOptions = { fetch: true }
let createOptions = { fetch: false, method: 'POST',
                      headers: { 'content-type': 'application/json' }
                    }
let updateOptions = { fetch: false, method: 'PUT',
                      headers: { 'content-type': 'application/json' }
                    }
let deleteOptions = { fetch: false, method: 'DELETE',
                      callback: (() => { listOptions.fetch = true }),
                      headers: { 'content-type': 'application/json' }
                    }
Most of the javascript variables have been discussed earlier. But we'll quickly discuss them one by one:
SERVER- Points to the REST endpoint server, used in thedata-restattributesemployees- Array that contains all the employee rows.departments- Array containing all the departments lookup rows.locations- Array containing all the locations lookup rows.result- contains the return value of the delete and update REST calls. Not used for display.addMode- indicates if we are in insert mode. Drives display of certain buttons.listOptions- options used to fetch all the employee rows from the REST end points.createOptions- options used to create an employee with the POST method.updateOptions- options used to update an employee with the PUT method.deleteOptions- options used to delete an employee with the DELETE method.
The Web App is now fully functional, but has no styling yet, and can be found in the Github repo under the name employees-bare.html. We will use this as the basis for a stylized version in the next section Styling with Tailwind. You can also use it if you would like to use another styling library.
Styling with Tailwind
Tailwind is a popular styling framework that provides powerful utility classes to style your elements inline without having to define CSS styles.
Install Tailwind
Tailwind can be installed in multiple ways. In our project we will use the runtime load option. This is not the most efficient way, as it will load a 150kb library of which we probably use only a small subset of classes. If you want to optimize this I recommend reading their optimizing for production section
<script src="https://cdn.tailwindcss.com"></script>They recommend adding this section at the bottom of your head tag. After installing you will have hundreds of utility classes and beautiful colors available.
Styling the header
<header class=" mb-6 p-12 bg-purple-800 text-white rounded-xl">
    <h1 class="text-4xl font-bold mb-2">
        <a class="underline">...</a>
    </h1>
    <h3 class="text-2xl font-bold">...</h3>
We give the header some space by adding a margin at the bottom mb-6 and padding p-12 all around. We change the background to a dark purple bg-purple-800 and a white font-color text-white. We wrap up the header styling with some rounded corners rounded-xl
Since all the H elements have their sizing and offsets reset by Tailwind, we make the H1 element text bigger text-4xl and stronger font-bold and give it some space at the bottom mb-2. We do something similar with the H3 element. Since the A element also has all styling removed, added an underline.
Styling the table and headers
<table class="w-full text-sm text-left text-gray-500" ..>
    <thead class="text-xs text-gray-700 uppercase bg-gray-50" ...>
      <tr>
        <th class="py-3">Id</th>
          ....
        <td class="text-2xl"> ...
          <button type="button">🔄</button>
          <button type="button">➕</button>
        </td>
Since I designed to UI for a desktop/laptop, not a mobile UI, I used a table to display the data. With w-full we make it use the width of the screen. We make the text small `text-sm` and align left with text-left and text a medium gray with text-gray-500.
Since we make the headers uppercase uppercase, we make them smaller with text-xs and make the text grey text-gray-700 with a slighty off white background color bg-gray-50.
The column headers we give space with a vertical padding of py-3 on the first th. In the button's column we increase the emoji icons' size with text-2xl.
Styling the table rows
<tr class="bg-white border-b">
    <td class="py-4" data-text="${u.item.employee_id}"></td>
    ...
    <td class="text-2xl">
        <button>💾</button>
        <button>🗑️</button>
        <button>💾</button>
        <button>❌</button>
    </td>
</tr>
Also a touch of styling on the data rows, some vertical padding py-4 on the first column and increase the size of the action button text-2xl
Styling the table footer
<tfoot>
    <tr>
        <td colspan="7" class="text-end px-6 py-4">🔄 Refresh rows, ➕ add new row, 💾 save row, 🗑️ delete row, and ❌ cancel new row.
        </td>
    </tr>
</tfoot>
We right align the footer underneath the table text-end add some horizontal px-6 and vertical py-4 padding space.
And that is it, with a few dabs of Tailwind magic it looks a lot better. The source code for this stylized version of the Reken enabled Web App is available in the repo under employees.html
Summary
Ok this turned out to be a little longer than I expected, and as a result I hope that this will make it easier to understand what is going on. There is a lot happening between the ~200 lines of Python and the ~80 lines of Reken and Tailwind powered HTML code.
Use the code snippets above for illustration, if you want to run the code, I recommend the source from the Github repo, it will save you time. See the README for run instructions.
I hope you enjoyed this post, if you have any comments or feedback you can contact me via hbroek (at) gmail.com.
Resources
I used the following services and Web pages to create the content for this blog post.
- Inspiration and initial Flask code: https://levelup.gitconnected.com/full-stack-web-app-with-python-react-and-bootstrap-backend-8592baa6e4eb
- SQLite documentation: https://sqlite.com/
- Python Flask: https://flask.palletsprojects.com/en/3.0.x/
- Reken: https://www.reken.dev/
- Tailwind: https://tailwindcss.com/
- SQL Schema diagram: D2 Playground
- UI wireframe: https://wireframepro.mockflow.com/
- Github repo: https://github.com/hbroek/reken-fullstack-demo
- Live UI demo: https://www.reken.dev/integrations/pwa-rest/employees.html
- Buy the Reken Developer Handbook